No está traducido. ¿Puedes echar una mano?
Mientras tanto, puedes consultar la ayuda en inglés:
To see the installation video — Click Here
First you should click on Admin mods, as shown in Figure 1:

Figure 1
The mods page will open and you will need to change the server to get the latest package, because the original one offered is not current. So click on Mods configuration, see Figure 2:

Figure 2
When the configuration page opens, you'll have the chance to define the mods provider you want to use. By default, you can use http://mods.tikiwiki.org as in the picture:
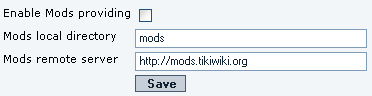
Figure 3
There we could switch to use other mod providers. In this case, change the settings and click on the Save button. then click on the Mods Install/uninstall link to bring you back to the mods page (see Figure 3). Usually you don't need to change the mods provider, since mods.tikiwiki.org tend to be the most updated and complete one to use.
Now you will need to download and install the package. You may need to go to the root of your install and run the fixperms.sh script to allow you to install this. To ensure that you have the latest version, click on Update remote index (Figure 4). Lets say that the latest version is 0.5 (change for newer version were needed in the following instructions and figures). Click on the link 0.5 as circled in red on the left. The last step is to install the package by clicking on the link install that is circled in red on the right (see Figure 4).

Figure 4
If you already have an earlier version of the Mod installed on your site (for instance, 0.5 and the latest version is 0.6), then you'll have the option to upgrade your Mod (you'll see the option 0.5 > 0.6). Click on the >0.6 link next to the install field to upgrade your AulaWiki Mod.
There are a few ways to get the menu to refresh to bring up the Aulawiki options. But your best bet is to log out and then log back in.
Mientras tanto, puedes consultar la ayuda en inglés:
To see the installation video — Click Here
First you should click on Admin mods, as shown in Figure 1:
Figure 1
The mods page will open and you will need to change the server to get the latest package, because the original one offered is not current. So click on Mods configuration, see Figure 2:
Figure 2
When the configuration page opens, you'll have the chance to define the mods provider you want to use. By default, you can use http://mods.tikiwiki.org as in the picture:
Figure 3
There we could switch to use other mod providers. In this case, change the settings and click on the Save button. then click on the Mods Install/uninstall link to bring you back to the mods page (see Figure 3). Usually you don't need to change the mods provider, since mods.tikiwiki.org tend to be the most updated and complete one to use.
Now you will need to download and install the package. You may need to go to the root of your install and run the fixperms.sh script to allow you to install this. To ensure that you have the latest version, click on Update remote index (Figure 4). Lets say that the latest version is 0.5 (change for newer version were needed in the following instructions and figures). Click on the link 0.5 as circled in red on the left. The last step is to install the package by clicking on the link install that is circled in red on the right (see Figure 4).
Figure 4
If you already have an earlier version of the Mod installed on your site (for instance, 0.5 and the latest version is 0.6), then you'll have the option to upgrade your Mod (you'll see the option 0.5 > 0.6). Click on the >0.6 link next to the install field to upgrade your AulaWiki Mod.
There are a few ways to get the menu to refresh to bring up the Aulawiki options. But your best bet is to log out and then log back in.
Quick start
- Use "Admin>Admin mods" to get the code, from: http://mods.tikiwiki.org
- Once installed, assign module "workspaces_assistant" to your group, and follow instructions there. So far, they include:
Welcome to AulaWiki! First configuration steps:
- Assign workspaces_my to the users that you want to use AulaWiki workspaces.
- Change theme to workspaces.css.
- Define the workspace roles and permission levels.
- Define the workspace types , use MenuID 100 or define your own menu. Assign Workspace type resources default resources and Assigned modules desktop modules.
- Create a workspace of the previosly defined type.
- View workspace desktopView the workspace desktop.
- My Workspaces module show the active workspace and menu.
- You'll notice (clear tiki caches if needed) a new entry in main menu, below admin, with AulaWiki main options.
- Admin Roles
- Workspace Types
- Admin Workspaces
;)
Last wiki comments